Related Posts


Podcasts


Are you leveraging Canva effectively? While Canva may appear as a simplified version of Adobe Photoshop, many businesses overlook its robust capabilities. This misconception often leads to paying for unnecessary software subscriptions. However, in truth, Canva offers a comprehensive toolkit, making it a potent design solution for businesses of any size.
Why do we know this?
Because we’re the first Certified Canva Partner in Australia, and we provide coaching (on behalf of Canva) for businesses looking to take full advantage of the software.
In this article, you’ll discover what we think are the five best Canva features as of March 20, 2024, and you’ll be equipped to take advantage of some features that you may not have known existed.
Best Feature #1: File Converter
Imagine you have a crucial presentation tomorrow, and you’ve just received feedback that requires significant changes.
But there’s a catch: the file is in a format that’s not native to your current design tool.
Panic sets in as the clock ticks.
This is where Canva’s File Converter becomes your design superhero. Here’s how it can help you with the power of its File Converter feature:
- Adobe & Office 365 Compatible: Canva’s File Converter allows you to upload and edit files from Office 365 or Adobe directly in Canva. This seamless integration means no more back-and-forth between different software, no more compatibility headaches, and no more wasted time. You can import your documents, make the necessary edits, and export them in your desired format—all within a single platform. For example, you can upload a Photoshop file, make edits, and then export the final product. As a designer, this gives you the ability to make complex designs, and then simply use Canva for quick and easy edits when necessary. As a business, this means you can pay a designer for more complex designs, and then use Canva to edit those files directly when you need small tweaks in wording etc.
- Adding Canva’s Suite of Tools to Adobe Products: Once your file is in Canva, the world is your oyster. You can leverage Canva’s vast library of templates, elements, and fonts to enhance your document. Need to add a splash of colour, insert an engaging infographic, or change the layout? Canva’s File Converter feature ensures that you’re not just editing your document; you’re enhancing it, infusing it with creativity that wasn’t possible in its original format.
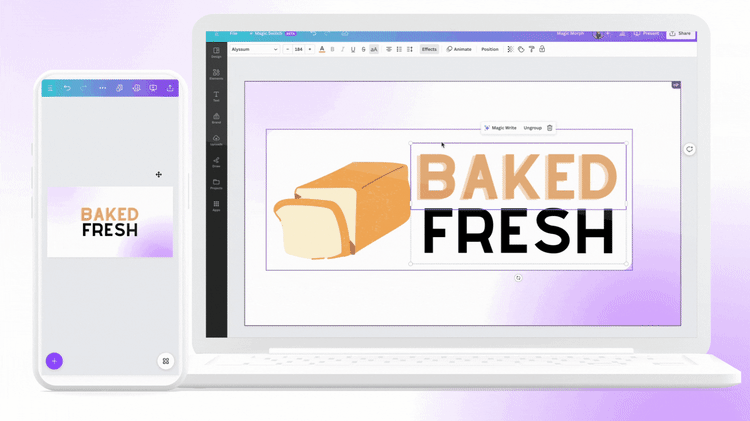
Best Feature #2: Magic Switch
Have you ever wished you could effortlessly transform your whiteboard brainstorming session into a polished presentation, document or blog post?
Canva’s Magic Switch feature is like having a design wizard at your fingertips, enabling you to convert one type of document into another with just a few clicks, streamlining your creative process and saving you valuable time.
Imagine you’ve just wrapped up a productive brainstorming session, and your whiteboard is filled with brilliant ideas. With Magic Switch, you can take a photo of the whiteboard and instantly convert it into a digital document, presentation, or even a blog post. This feature is perfect for capturing the spontaneity and energy of live discussions and translating them into structured, shareable formats.
But it isn’t just about converting whiteboards.
You can transform a variety of document types to suit your needs. Here’s some potential use cases:
- Turn a report into a visually engaging presentation
- Convert your blog post into a newsletter
- Turn a presentation into a blog post
Here’s how easy it is to use the Magic Switch feature:
Magic Switch makes these transitions smooth and effortless, ensuring your content is always in the right format for your audience. It saves an enormous amount of time in the content production process. If you want to find more ways to save time in your content production process, you might be interested in the article below.
Read: How to Save 20+ Hours Per Week With Custom ChatGPT Bots

Best Feature #3: Magic Morph
Visual impact is crucial in capturing and retaining the attention of your audience. Creating 3D text is one way to achieve this.
But this usually takes significant time and effort. However, Canva’s Magic Morph tool allows you to do this within seconds using the power of AI.
Below you can see how it transforms text from 2D to 3D, creating an attention-grabbing effect.

This feature is particularly effective for headings, titles, or any text you want to stand out in your design.
One of the most appealing aspects of Magic Morph is its accessibility. You don’t need a background in graphic design or expertise in complex software to create stunning 3D text effects. Canva’s intuitive interface makes it easy for anyone to apply Magic Morph and achieve professional-looking results. All you have to do is provide a prompt to the Magic Morph AI and then the text will transform.
Here’s a GIF that demonstrates just how easy it is to use this feature:
Here’s an official Canva guide on using Magic Morph in your designs.
Best Feature #4: Brand Kits
Brand consistency is key for any business. It’s what makes your content recognisably yours, regardless of where it appears.
Canva’s Brand Kits feature is a powerful tool that allows you to infuse your unique brand identity across various templates with just a few clicks, ensuring consistency and saving you an enormous amount of time.
Here’s what it does:
- Streamline Your Branding: Canva’s Brand Kits let you store your brand’s logos, colour palettes, and fonts in one place. This means that whenever you’re creating new content, you can easily apply your brand elements to ensure consistency across all your designs. Whether you’re working on social media graphics, presentations, or marketing materials, your content will always be on-brand, and it’ll be quick and easy to apply your branding styles to your designs
- Effortless Customisation: Imagine having access to thousands of templates that can be instantly updated to reflect your brand’s style. With Canva’s Brand Kits, this is a reality. You no longer need to manually adjust colours or fonts for each new design. Just select a template, apply your brand kit, and voilà – your design is ready, oozing with your brand’s essence
- Empower Your Team: If you’re working with a team, Canva’s Brand Kits are a game-changer. They ensure that everyone is on the same page, using the correct brand elements. This feature not only maintains visual consistency but also enhances team efficiency, as there’s no need to double-check if the right colours or fonts are being used
Here’s a tutorial on how to use Brand Kits:
In essence, Canva’s Brand Kits are not just about maintaining a consistent brand image; they’re about making the branding process as effortless and efficient as possible.
Whether you’re a solo entrepreneur or part of a larger team, this feature is designed to help you create cohesive, impactful content that resonates with your audience and reinforces your brand identity.
Want to learn more about Brand Kits? Check out this comprehensive official Canva Guide on Brand Kits.
Best Feature #5: Magic Studio Image Editor
What if you wanted to make some complex changes to an image but spend one tenth of the time editing it?
Canva’s Magic Studio Image Editor makes that possible. It offers advanced features that are accessible to users of all skill levels. Here’s some of the things it can help you do:
- Background Removal in Seconds: One of the standout features of Magic Studio is the ability to remove backgrounds from images with just a click. This is particularly useful for creating professional-looking graphics, where you need your subject to stand out without any distracting background elements. You can also use this feature in videos. Here’s a complete tutorial on background removal in Canva
- Transformative Editing: Imagine changing an object in your image to something entirely different or moving a person to a different area within the picture. Magic Studio allows you to do this with ease, opening up a realm of creative possibilities. This feature is perfect for marketers and content creators who need to adapt images to fit their narrative or branding. Here’s one example of this in action:
- Expand Your Original Image: Sometimes, the image you have isn’t quite the right size or composition for your needs. Magic Studio’s image expansion feature lets you extend your image beyond what the image you have displays. In other words, it predicts what the rest of the image would look like if it was larger, and then creates that for you. You can learn to use Magic Expand here. Here’s an example of this in action:
- And Much More: There’s so much more you can do with Canva’s Magic Studio, so be sure to check out the full range of features here.
So, What’s Next?
Some might assume that Canva, because it is simpler to use than Adobe, is simple in its capabilities as well.
But that’s just not the case.
With these five features, along with all the other capabilities Canva offers, you should be able to produce professional designs at scale.
Note that some of these features require Canva Pro. Next, you’ll want to find out what exactly Canva Pro includes, and whether you’re better off using the free version or not.
Read: How Much is Canva Pro and Is It Worth It?