









How Do You Log In and Set Up HubSpot CRM?: The Complete Guide for New Users

Key Takeaways
- Login page: Always log in via app.hubspot.com/login and bookmark it. This avoids phishing look-alikes
- Multiple login methods: Password, Google, Microsoft, Apple, passkeys, or SSO (Professional and Enterprise plans only)
- Setup order matters: Configure account defaults and permissions before pipelines, and pipelines before imports
- Data hosting: Australian accounts can be hosted in HubSpot’s Sydney data centre for local data residency
- Import last, not first: Clean and map your data before importing to avoid duplicate records and broken associations
- DIY is realistic for simple setups, but remember that it gets riskier once pipelines, teams, and integrations multiply
You’ve just logged into HubSpot for the first time, and the dashboard in front of you has more menus than you expected.
Maybe you’ve just signed up for the free CRM to test it out. Maybe your company bought it and you’re the one setting it up for your team.
Either way, the fear is the same: get the order wrong, and you’ll be redoing pipelines, properties, and imports weeks from now.
This HubSpot guide walks you through exactly how to log in and set your CRM up in the right order, so you’re not left guessing at what to click first.
As a HubSpot Diamond Partner, RedPandas has set up HubSpot for Australian businesses across industries.
And we see the same mistake constantly: new users rush into importing data or building pipelines before the basics are locked in, then spend their second month cleaning up the first.
This guide gives you the correct order: how to log in using every available method, what to configure first, and the setup sequence that avoids rework later.
Quick Answer
Log in to HubSpot at app.hubspot.com/login using your email and password, Google, Microsoft, Apple, a passkey, or SSO (Professional and Enterprise accounts only). Once you’re in, set your account defaults and invite your team before touching pipelines or importing data.
The correct setup order is: account defaults and data hosting, then permissions, then custom properties, then deal pipelines, then connect email and calendar, then import contacts and companies last.
Importing before the rest is configured is the single biggest cause of duplicate records and broken pipelines in new HubSpot accounts.
HubSpot CRM Login: Your Step-by-Step HubSpot Guide
Logging in sounds simple, but HubSpot gives you six different ways to do it. Here are the most common methods, plus what to do when login goes wrong:
How to Log In to HubSpot
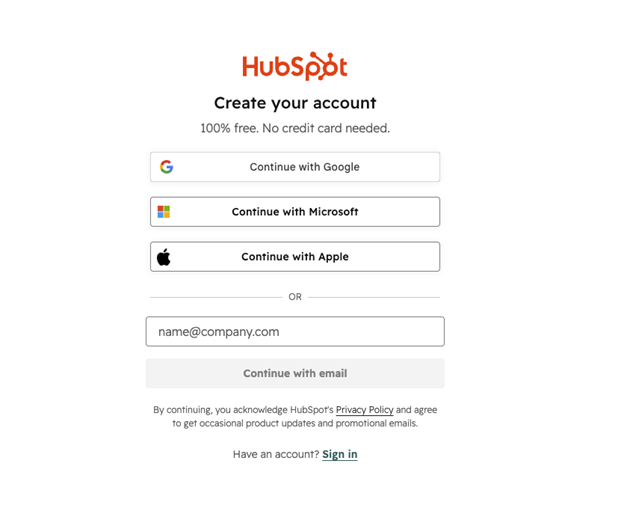
- Go to https://app.hubspot.com/signup-hubspot: Bookmark this exact URL: it’s the only official HubSpot login page, and typing it manually helps you avoid phishing look-alikes
- Enter your email address: HubSpot checks your domain and automatically routes you to the correct screen
- Choose your login method:
- Email and password
- Sign in with Google
- Sign in with Microsoft
- Sign in with Apple
- Passkey (biometrics, Face ID, or device PIN)
- Single sign-on (Professional and Enterprise accounts only)
- Complete two-factor authentication if it’s turned on for your account.
Setting Up Two-Factor Authentication (2FA)
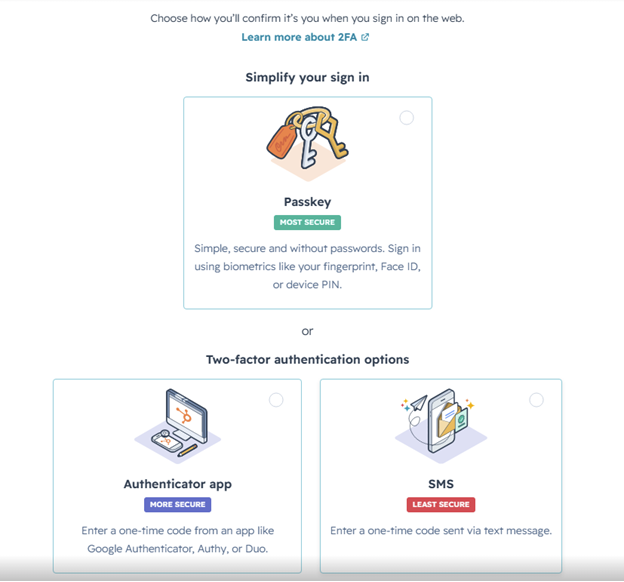
If you’re on a Starter, Professional, or Enterprise account and log in with a password, HubSpot requires 2FA. You’ll be prompted to set it up the first time you log in, and it can’t be turned off.
Your 2FA options:
- Passkey: Log in with biometrics or a device PIN
- Authenticator app (recommended): A one-time code from an app like Google Authenticator
- SMS: A one-time code by text (HubSpot flags this as the least secure option)
Set up a secondary method alongside your primary one, and download your backup codes. If you lose access to your primary method and have no backup, HubSpot’s reset process takes 48 to 72 hours.
Troubleshooting Common HubSpot Login Issues
| Problem | What to do |
| Forgot your password | Click “Forgot password” on the login page. Add hubspot.com to your email allowlist if the reset email doesn’t arrive. |
| “You have no accounts” message | Your account may have been deactivated; contact your Super Admin. |
| Stuck on an identity verification code | HubSpot doesn’t recognise your browser or device. Check the inbox for the email you used to sign up. |
| Login page won’t load or behaves oddly | Confirm your browser is supported, and check status.hubspot.com for a known outage. |
| Repeatedly asked to log in | Turn on “Allow all cookies” for third-party cookies in your browser settings. |


4 Reasons Your HubSpot Implementation Could Fail (and How to Avoid It)
HubSpot Getting Started: What to Configure First
Once you’re logged in, don’t touch pipelines or imports yet.
Here is a handful of settings that affect every user on your account, and why getting them right now saves you a redo later:
Set Your Account Defaults
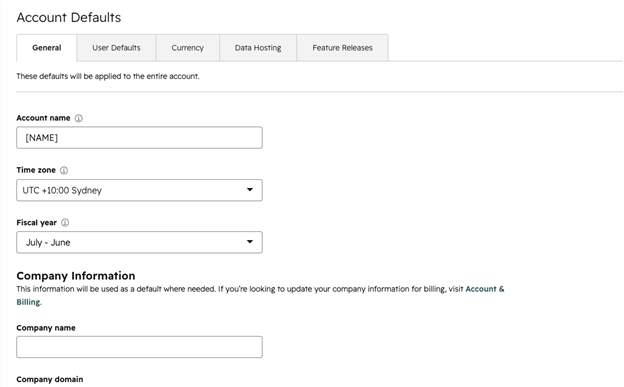
Head to Settings -> Account Defaults. This is where account-wide settings live: the ones that affect your whole team, not just you.
- Time zone: Controls when scheduled emails and social posts go out, and how your analytics display. HubSpot defaults new accounts to US/Eastern, so change this first if you’re based in Australia.
- Language and currency: Sets the default display language and currency across the account.
- Data hosting: Confirms which regional data centre stores your account data. Australian businesses can host their account data in HubSpot’s Sydney data centre, launched in 2025, rather than defaulting to the US.
Note: Some timestamps, like logged sales activity and record history, follow your computer’s local time zone rather than the account setting. If your reports look off by a few hours, that’s usually the reason.
Invite Your Team and Assign Seats
HubSpot moved to a seat-based model in 2024. Before you invite anyone, decide who needs a paid seat and who doesn’t:
| Seat Type | What Is It For? |
| Core seat | Full access for anyone creating or editing records, but without Sales or Service tools |
| Sales or Service seat | Needed for sales or service-specific features like sequences or the help desk |
| View-only seat | Free and unlimited, ideal for executives or stakeholders who only need to see data, not edit it |
To add someone, go to Users & Teams -> Create user, enter their email, assign a seat, and set their permissions before sending the invite.
Set Permissions Before Anyone Starts Working
Only a Super Admin can create other Super Admins, so keep that role limited to one or two people. For everyone else, set permissions by function: marketing, sales, service, and reporting access can all be granted separately, rather than giving every new user full account access by default.
Getting this right before your team logs in for the first time means you’re not chasing down access requests and permission fixes in week two.
HubSpot Setup Guide: The Core CRM Steps in Order
This part of the HubSpot guide covers the four steps that actually shape how your CRM works day to day. Do them in this order, and you’ll avoid rebuilding pipelines or re-tagging contacts later.
Step #1: Create Your Custom Properties
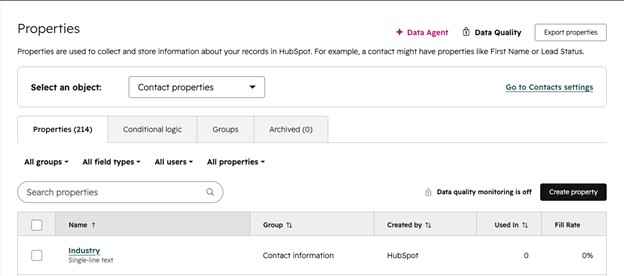
Before you build pipelines or import anything, create the custom properties your business actually needs. To do this, go to Settings > Properties and add fields for the data your team tracks, such as:
- Industry
- Lead source
- Contract value
Do this first. If you import data into properties that don’t exist yet, HubSpot creates unmapped fields you’ll need to clean up afterwards.
Step #2: Build Your Deal Pipeline
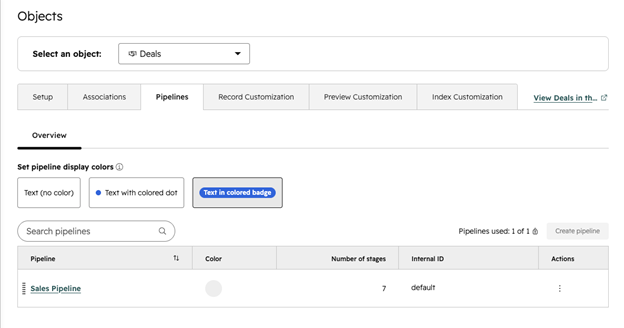
HubSpot’s default sales pipeline has seven stages:
- Appointment scheduled
- Qualified to buy
- Presentation scheduled
- Decision maker bought-in
- Contract sent
- Closed won
- Closed lost
Most businesses need to rename or restructure these to match their actual sales process.
To edit your pipeline:
- Go to Settings -> Objects -> Deals -> Pipelines
- Select the pipeline you want to edit
- Rename stages, add new ones, or delete ones that don’t apply
- Confirm you have a Closed Won and a Closed Lost stage: reporting breaks without both
Keep it to around five to seven stages maximum. If your pipeline needs more than that, it’s usually a sign you need a second pipeline instead of a longer one.
Step #3: Connect Your Email and Calendar
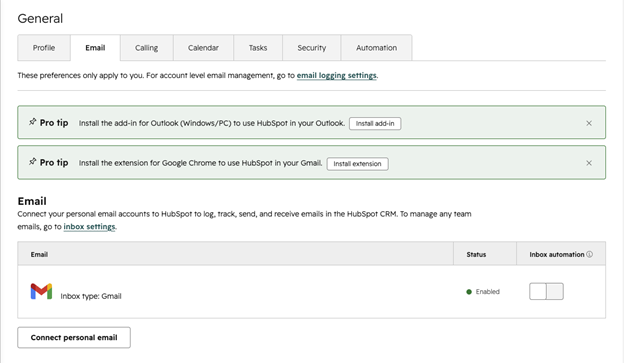
Go to Settings -> General -> Email tab -> Connect personal email, then choose Gmail, Microsoft 365, Exchange, or IMAP. This logs your sent and received emails against contact records automatically and syncs your calendar for meeting scheduling.
Connecting your inbox at this stage before importing contacts means every email you send afterwards is captured against the right record from day one.
Step #4: Import Your Contacts and Companies Last
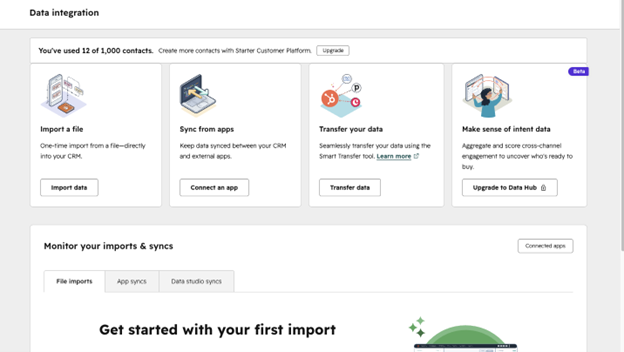
Importing is the final step, not the first. Clean your data before you import:
- Remove duplicates and fix invalid emails
- Standardise formatting (phone numbers, company names)
- Map each column to the custom properties you created in Step 1
Run a small test import of 20 to 50 records before uploading your full list to catch mapping errors while they’re still easy to fix. Import companies before contacts where possible, since HubSpot uses this to auto-associate the two.
Following this order of properties, pipeline, email, then import, is what separates a clean setup from one you’re still fixing three months in.
To learn more about why this step matters, check out our guide on the importance of having proper HubSpot list hygiene here.
DIY vs Guided vs Partner-Led Setup: Choosing the Right Path in This HubSpot Guide
You’ve got three ways to get HubSpot set up: do it yourself, use HubSpot’s own guided onboarding, or bring in a partner. Here’s how the three stack up.
| Path | Cost (AUD, ex-GST) | Best for | Typical timeline |
| DIY setup | Free; your time is the only cost | Free or Starter tier, one pipeline, simple sales process | 4 days to 2 weeks |
| HubSpot’s guided onboarding | ~AU$5,700 (Marketing Hub Professional) to AU$10,080 (Enterprise), mandatory on Professional and Enterprise plans | Teams on Professional or Enterprise who want HubSpot’s own specialists running the setup | 4 to 6 weeks |
| Partner-led implementation (Based on RedPandas HubSpot Onboarding Pricing) | – HubSpot Guided Onboarding – AUD $5,900 – HubSpot Managed Onboarding Pro – AUD $11,500 – HubSpot Managed Onboarding Enterprise – From AUD $38,500 | Multi-hub setups, complex sales processes, or teams that want configuration done for them | 4 to 12 weeks, depending on scope |
HubSpot calculates GST separately for Australian customers before you complete any purchase, so add ten per cent to the figures above for your actual invoice total.
If your sales process fits on one page and you’re on a free or Starter plan, DIY is a reasonable starting point. Past that, the decisions around pipelines, permissions, and data structure get expensive to unwind later, and it’s worth paying for expertise rather than rebuilding your CRM in month three.
To learn more about the benefits of a partner-led implementation, check out our guide on onboarding with a HubSpot Partner vs. HubSpot’s internal team.
FAQ: Your HubSpot Guide to Login, Setup, and Getting Started
How do I log in to HubSpot CRM?
Go to app.hubspot.com/login and enter your email address. HubSpot will show your available login methods: password, Google, Microsoft, Apple, passkey, or single sign-on (Professional and Enterprise only). If two-factor authentication is turned on, you’ll complete a second verification step using a passkey, an authenticator app, or SMS before you reach your dashboard.
What should I do first after creating a HubSpot account?
Set your account defaults first (time zone, language, currency, and data hosting location) before inviting your team or touching pipelines. These settings apply account-wide, so changing them after your team is active creates inconsistent data and confusing reports. Australian businesses can choose HubSpot’s Sydney data centre for local data hosting.
How do I set up HubSpot CRM for a new business?
Follow this order: create custom properties, build your deal pipeline, connect your email and calendar, then import your contacts and companies last. Clean your data before importing to avoid duplicates. Skipping this order (especially importing data before your properties and pipeline exist) is the most common cause of CRM rework in the first month.
Can I use HubSpot CRM for free?
Yes. HubSpot’s free CRM includes up to two users and 1,000 contacts, with no expiration date and no limit on customer data storage. It covers contacts, deals, tickets, forms, and basic email tracking. Most growing teams outgrow the two-user or 1,000-contact limit within their first year and upgrade to a paid Starter tier.
How do I invite my team to HubSpot?
Go to Users & Teams, click Create user, and enter their email address. Assign them a seat (like Core, Sales, Service, or the free View-only seat), then set their permissions before sending the invite. Only Super Admins can create new Super Admins, so keep that role limited to one or two people.
How do I import contacts into HubSpot without creating duplicates?
Clean your data first: remove duplicates, standardise formatting, and fix invalid emails before uploading. Map each spreadsheet column to an existing HubSpot property rather than letting HubSpot create new ones automatically. Run a test import of 20 to 50 records to check your mapping before importing your full contact list.
Do I need to pay for HubSpot onboarding?
Only on Professional or Enterprise plans. HubSpot requires a mandatory onboarding fee, typically AU$5,700 for Marketing Hub Professional and up to AU$10,080 for Enterprise. Free and Starter accounts have no onboarding fee, and a partner’s implementation fee usually replaces HubSpot’s own onboarding charge.
Can I fix HubSpot setup mistakes later?
Most setup mistakes are fixable, but some are costly to unwind. Renaming pipeline stages or adding properties is simple. Merging duplicate contacts imported without cleanup or restructuring a pipeline with hundreds of active deals takes considerably longer. Fixing mistakes in week one is faster than fixing them after months of use.
How long does it take to set up HubSpot CRM?
A DIY setup on the free or Starter tier typically takes days to two weeks. HubSpot’s guided onboarding for Professional and Enterprise accounts runs four to six weeks. Partner-led implementations take four to twelve weeks, depending on complexity, data volume, and how many hubs you’re configuring.
Your HubSpot Guide Recap: What to Do Next
You’ve now got the full path: log in, configure your defaults, build your CRM in the correct order, and avoid the mistakes that turn a clean setup into a data clean-up project.
Bookmark this HubSpot guide and work through it in order rather than jumping ahead.
Quick recap:
- Log in at app.hubspot.com/login and set up 2FA before anything else
- Configure account defaults like time zone, data hosting, and currency before inviting your team
- Build in this order: properties, pipeline, connected email, then import
- Choose your setup path, such as DIY, HubSpot’s guided onboarding, or a partner, based on your plan tier and how complex your sales process is
- Revisit your setup quarterly. Clean data doesn’t stay clean on its own
Need help setting your HubSpot portal up for success? Get in touch with our growth experts for a free consultation.
In 30 minutes, you’ll walk away with insights on how to start the right way, how to set up your portal for your business, and how you can maximise HubSpot for growth… Regardless of whether you work with us or not.

Get In Touch With Our Growth Experts
About the Author
This article was written by the team at RedPandas Digital, a HubSpot Diamond Solutions Partner based in Sydney, Australia. RedPandas is one of a small number of agencies accredited under HubSpot’s Partnered Scale Onboarding programme, and has delivered results including a 49.8% revenue increase and 378% lead growth within five months for an Australian client.
About the Author




Get the best content marketing insights right in your inbox!
Subscribe to our Newsletter and get marketing insights delivered to your inbox every week.